
- July 2017: Apologies to PROJECT RC Readers! Firstly I would like to thank all the sponsors, subscribers and readers of my blog for your support. I would like to apologise for the recent image outage in my articles. The image hosting site I have been using, ‘Photobucket’ has recently decided that they will no longer host images to websites, blogs, etc unless you pay a ridiculous fee of $500 – This is particularly infuriating since there was no notice given. Since Photobucket has resorted to extortion for their users I will no longer use their services forever. This means that I will have to move all my article images to another platform and embed new coding for all those images which is a real PITA and a lot of work. Anyway I am in the process of doing that so I kindly ask readers to understand the situation and be patient. PROJECT RC article images will soon be operational again.
This ‘How To’ article will describe the particular steps and components I use to build and shim an upgraded RC18T drivetrain using aftermarket and stock components. This drivetrain comprises of upgraded titanium ball differentials, a stock aluminium driveshaft, aftermarket ceramic bearings and stainless steel shims. This article will focus on the installation of the various sub assemblies and the shimming required to create a smooth running and efficient drivetrain.
This article coincides with the current build article:
Custom Build: RC18T Modified Custom Build – March 2015
The following assembly procedure does not include the application of the required greases and lubricants for the drivetrain. In addition components are installed without the use of threadlock. These will be applied during final assembly. By ‘dry’ assembling the drivetrain components you can accurately and easily determine the subtle mechanical differences in the tolerances between the gears and component fitment without a layer of grease between the gear teeth altering or concealing the actual state of the mechanical elements. Through this method you can accurately install the correct shim thicknesses to set the proper the gear mesh and component fitment.

PART 1: DRIVESHAFT ASSEMBLY
For this driveshaft assembly I am using a combination of stock and aftermarket components which have proven to be the most reliable and best fit in previous builds. I have chosen to use an aluminium 60 tooth spur gear made by GPM fitted to a stock Team Associated aluminium driveshaft. The spur and pinion combination will be 60/14 as I have found this to be the ideal setup in a previous build using a high powered 6800kv brushless system. 60/14 will be a baseline for this particular build with a possible adjustment to 60/13 if required as the brushless system for this build is more powerful at 8200kv. The driveshaft input crown gears are stock Team Associated plastic/nylon gears. To complete the assembly BOCA ceramic yellow seal bearings are fitted to the driveshaft. The selection of these particular components is based on their overall performance and previous experience with them. To read more about the selection please refer to the article link below:
Product Review: RC18T Differential & Transmission Components
Parts & Materials Used:
x1 GPM Aluminium Main Gear 60T – #AR060T
x1 Team Associated RC18 Aluminium Driveshaft. – #ASC21089
x2 (Sets) Team Associated 18T Diff & Input Gear – (Input Gears Only) – #ASC21022
x1 Boca Ceramic Yellow Seal Bearing (8.0 x 12.0 x 3.5mm) – #SMR128C-2YS NB2
x2 Boca Ceramic Yellow Seal Bearings (4.0 x 8.0 x 3.0mm) – #SMR84C-2YS NB2


PART 2: DRIVESHAFT SHIMMING
The following stage involves the installation of the main drivetrain sub assemblies; completed driveshaft and completed differentials. The focus will be checking fitment of the driveshaft and adjusting using the appropriate shims
Parts & Materials Used:
x1 Team Associated RC18T Chassis with GPM Aluminium Gearbox Housings – (Part-Assembled)
x1 Team Associated RC18 Aluminium Driveshaft with installed spur and input gears and bearings – (Assembled)
x2 eRacing Pro Titanium Ball Differentials with installed bevel gears and bearings – (Assembled)
x2 Kyosho Shims (4.0 x 6.0mm – 0.3 thickness) – #KYO96642


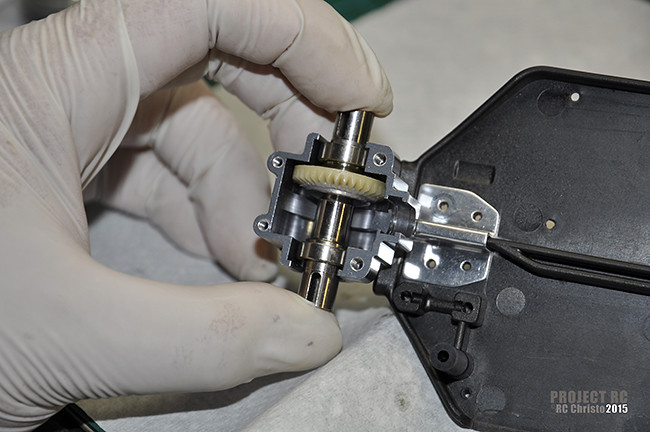
PART 3: DIFFERENTIAL SHIMMING
Once the driveshaft has been set into position with the appropriate shims, the next stage is to install the assembled differentials and shim so that there is not excessive play between the diff bevel gear and the driveshaft input gear. Un-shimmed and ‘loose’ differentials are the main cause of gear damage as excessive space in between two mated gears will eventually cause the gear teeth to slip against each other and wear the gear teeth prematurely ultimately ‘stripping’ the gears.
It is important to mention that as a result of the manufacturing process there may be slight differences in the fitment tolerances of various components. For this particular assembly, Kyosho Shims (8.0 x 10.0mm – 0.3 thickness) have been fitted on each side of the differentials to form a perfect fit. For other people referencing this article, you may find that you may only need 0.2 thickness, or a combination of 0.2 and 0.3 for example.
Parts & Materials Used:
x1 Team Associated RC18T Chassis with GPM Aluminium Gearbox Housings – (Part-Assembled)
x1 Team Associated RC18 Aluminium Driveshaft with installed spur and input gears and bearings – (Assembled)
x2 eRacing Pro Titanium Ball Differentials with installed bevel gears and bearings – (Assembled)
x4 Kyosho Shims (8.0 x 10.0mm – 0.3 thickness) – #KYO96644
Good Quality electrical tape.


![]()
Thank you for checking out this article. I hope it helps readers with some ideas on their next build. If you have questions or need some advice on a particular stage feel free to write a comment below and I will answer them.
Cheers. RC-Christo.
